
Lightroom is a powerful tool for editing photos and managing your photo library, but it can be overwhelming to track down the edited images you’re looking for. Today, I’m going to show you how to view the edited photos in Lightroom so that they’re easy to find.
Explain how to export them so that you can share them with friends or clients. And finally, we’ll show you how to save these edits so that they’re backed up forever!
How to view and export only edited photos in Lightroom
The “Library” module is where you can view the photos that are currently in your Lightroom catalog. To go there, click on “Library” on the top right of the main window.
In order to view and export the edited photos here’s an easy way to do:


How to find edited photos in Lightroom
To find your edited photos in Lightroom, you’ll need to use the Library module.
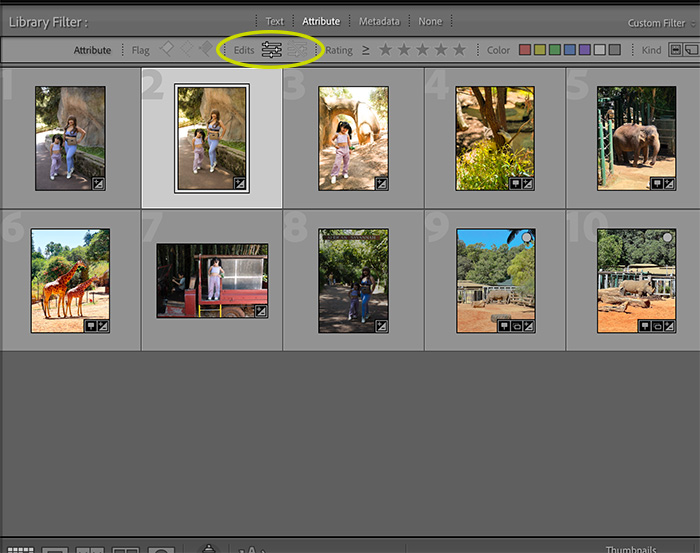
If you didn’t set flags, ratings, and color labels to tag your photos, you can filter based on edit status. Follow these 3 easy steps to find them:
- Go to the Library module.
- Click Attribute on the Library filter options at the top.
- Click Filter based on edit status, find edits (the icons with sliders) if both options are disabled, click the icon on the left as shown in the photo.
I find these steps so much easier even when I’m editing a large number of photos. But for more focused and careful editing, I use the flags and labels. They help me focus on the task of editing a photo without worrying about losing track of it.
Comparing original and edited photos
Comparing original and edited photos in Lightroom is super easy. Just follow these steps:
- Simply click on the image and then click Develop to open the Develop module.
- Click the Y|Y icon (cycles between before and after views) just below your photo to see how your edits affected the photo.

Saving your edited photos
So now that you’re done creating a masterpiece, it’s time to save your edits. Here’s how to do it:

How do I revert back to the original photo?
Oops, it looks like you made a mistake and instead of a masterpiece, you made something that looks like a complete mess. Don’t worry, it happens to the best of us. Here’s how to revert back to your original photo:

And that’s it! Be better this time, okay?
Check out more Lightroom tutorials:
How to remove background in lightroom
How to sign out of Lightroom on Mac
FAQ
Can you save edited photos in Lightroom?
Yes, you can do this by selecting your photos then choosing File > Export and choosing an option you want.
Why did my Lightroom edits disappear?
The most common cause for this is because selected a new or different catalog. Also make sure that you didn’t accidentally delete your photos.

Emma Lucy is the Founder & CEO of Emma Lucy Photography. She has over a decade of experience shooting weddings and other intimate events. She also tests the latest digital camera bodies, lenses, analog cameras, and other gear from Canon, Nikon, Sony, and other camera brands. She is From London and currently lives in the United States of America, where she spends most of her time as a self-employed professional photographer and writer.